


A recipe for powerful, statically-rendered experiments at scale.
A/B testing and experiments help you build a culture of growth. Instead of guessing what experiences will work best for your users, you can build, iterate, and adapt with data-driven insights to produce the most effective UI possible.
In this article, you'll learn how we built a high-performance experimentation engine for vercel.com using Next.js and Vercel Edge Config, allowing our developers to create experiments that load instantly with zero Cumulative Layout Shift (CLS) and a great developer experience.
Note: This post is historical and describes Edge Functions as they existed at the time. For new projects, use Vercel Functions with the Node.js runtime and Fluid compute.
Want to build better experiments?
We're happy to help.
Get in Touch
Copy link to headingGreat experiments matter
Experiments are a way to test how distinct versions of your application perform with your users. With one deployment, you can present different experiences for different users.
While experiments can be incredibly insightful, it's historically been difficult to run great tests on the Web:
Client-side rendering (CSR) your experiments will evaluate which version of your app a user will see after the page has loaded. This results in poor UX since your users will have to wait for loaders while the experiment is evaluated and eventually rendered, creating layout shift.
Server-side rendering (SSR) can slow page response times as experiments are evaluated on demand. Users have to wait for the experiments along a similar timeline as CSR—but stare at a blank page until all of the work is done to build and serve the page.
These strategies end up with a poor user experience and give you bad data about your experiments. Because you’re making your load times worse, you are negatively impacting what should have been your control group.
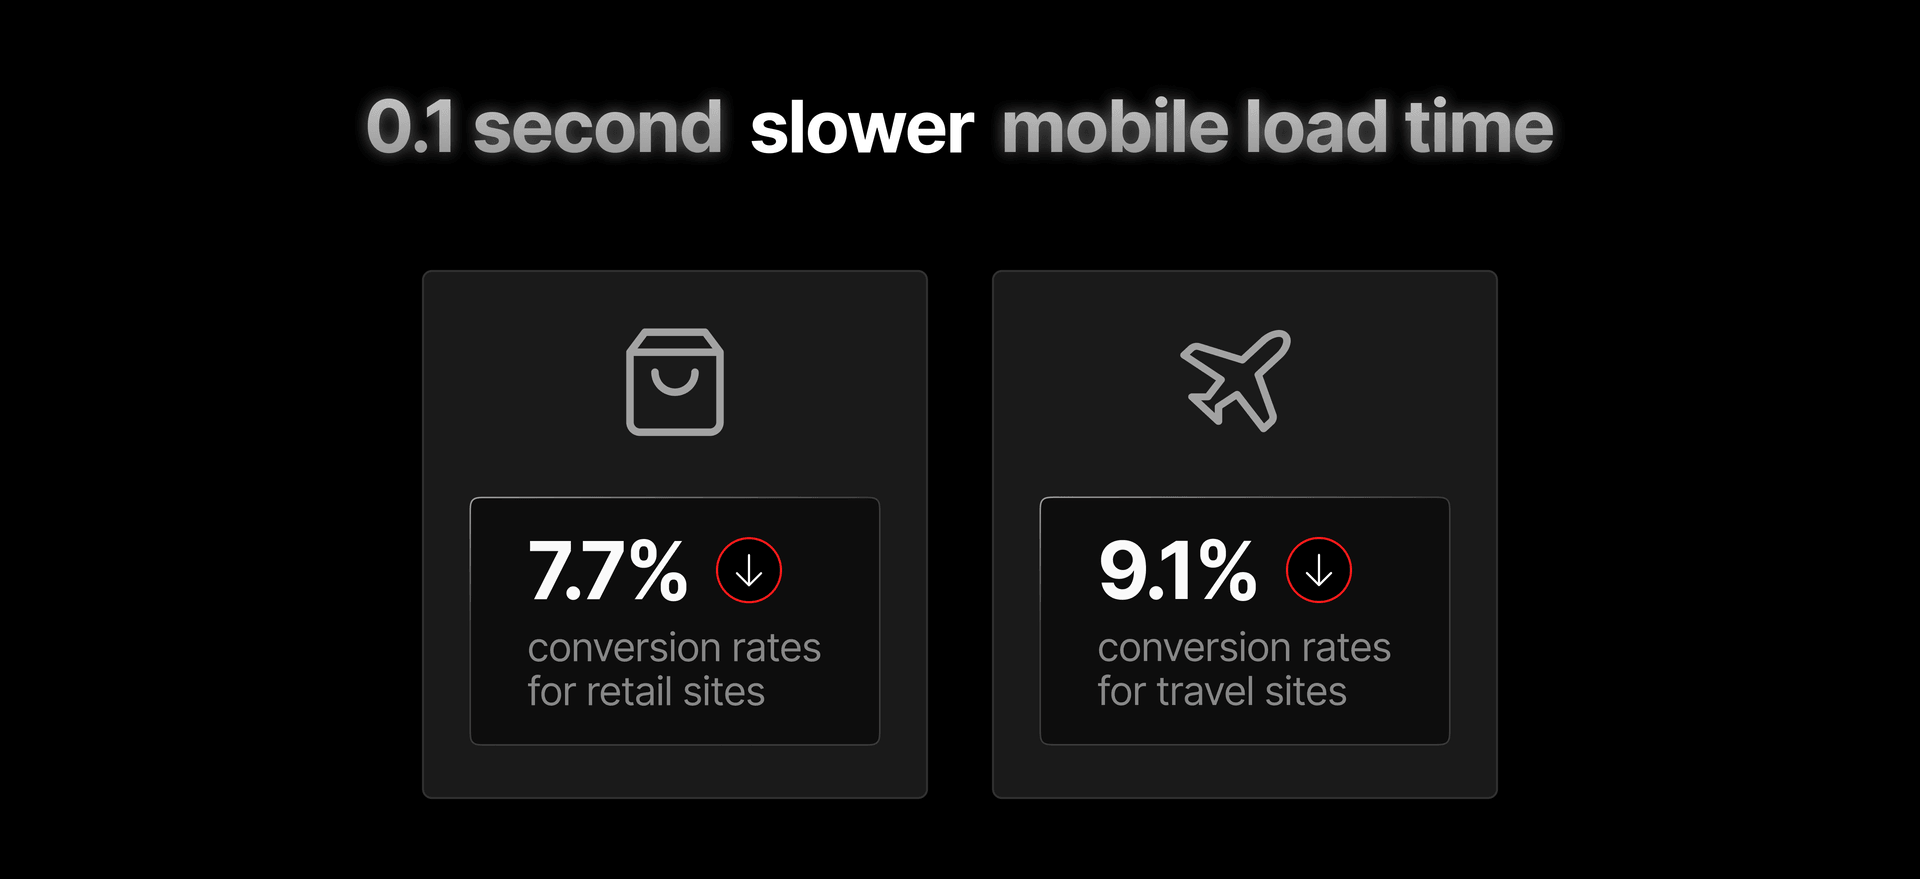
Milliseconds make millions, so using the right rendering strategies makes a big difference. Slow load times give you inaccurate results and false impressions about your experiments.

Copy link to headingDefining the experiment engine
For our engineers who aren’t working with experimentation every day, we wanted a simple, standardized path to effective, high-performance experiments. Our requirements were:
Zero impact on end-users
Automatically keep users in their "experiment bucket" using our feature flag vendor
Send events to our data warehouse when users have given consent
Excellent "out-of-the-box" developer experience
Using the right tools, we knew we could improve both our internal developer experience and end-user experience.
Copy link to headingLeveraging Edge Config for read speed
Vercel Edge Config is a JSON data store that allows you to read dynamic data as geographically close to your users as possible. Edge Config reads complete within 15ms at P99 or as low as 0ms in some scenarios.
import { NextResponse, NextRequest } from 'next/server'import { get } from '@vercel/edge-config'
export async function middleware(request: NextRequest) { if (await get("showNewDashboard")) { return NextResponse.rewrite(new URL("/new-dashboard", request.url)) }}Using an Edge Config to rewrite to a new dashboard design.
We're leveraging Statsig's Edge Config Integration to automatically populate the Edge Config connected to our project with the experiment’s evaluation rules. We can then fetch our experiments in our code easily.
import { createClient } from '@vercel/edge-config'import { EdgeConfigDataAdapter } from 'statsig-node-vercel'import Statsig from 'statsig-node'
async function initializeStatsig() { const edgeConfigClient = createClient(process.env.EDGE_CONFIG) const dataAdapter = new EdgeConfigDataAdapter({ edgeConfigClient: edgeConfigClient, edgeConfigItemKey: process.env.STATSIG_EDGE_CONFIG_ITEM_KEY, })
await Statsig.initialize(process.env.STATSIG_SERVER_KEY, { dataAdapter })}
async function getExperiment(userId, experimentName) { await initializeStatsig() return Statsig.getExperiment({ userId }, experimentName)}Populating our runtime with our experimentation configuration.
Copy link to headingUsing Next.js for high-performance, flexible experiences
As a high-level overview, we are going to:
Copy link to headingCreating experiments in code
To create the most predictable developer experience for ourselves and our teammates, we created a typesafe, single source of truth for our monorepo. Each experiment defines possible values for each parameter along with the paths where the experiment is active. The first value in each array is the default value for a parameter.
export const EXPERIMENTS = { pricing_redesign: { params: { enabled: [false, true], bgGradientFactor: [1, 42] }, paths: ['/pricing'] }, skip_button: { params: { skip: [false, true] }, // A client-side experiment won't need path values paths: [] }} as constCreating static types for our source code.
Copy link to headingPre-rendering experiment variations
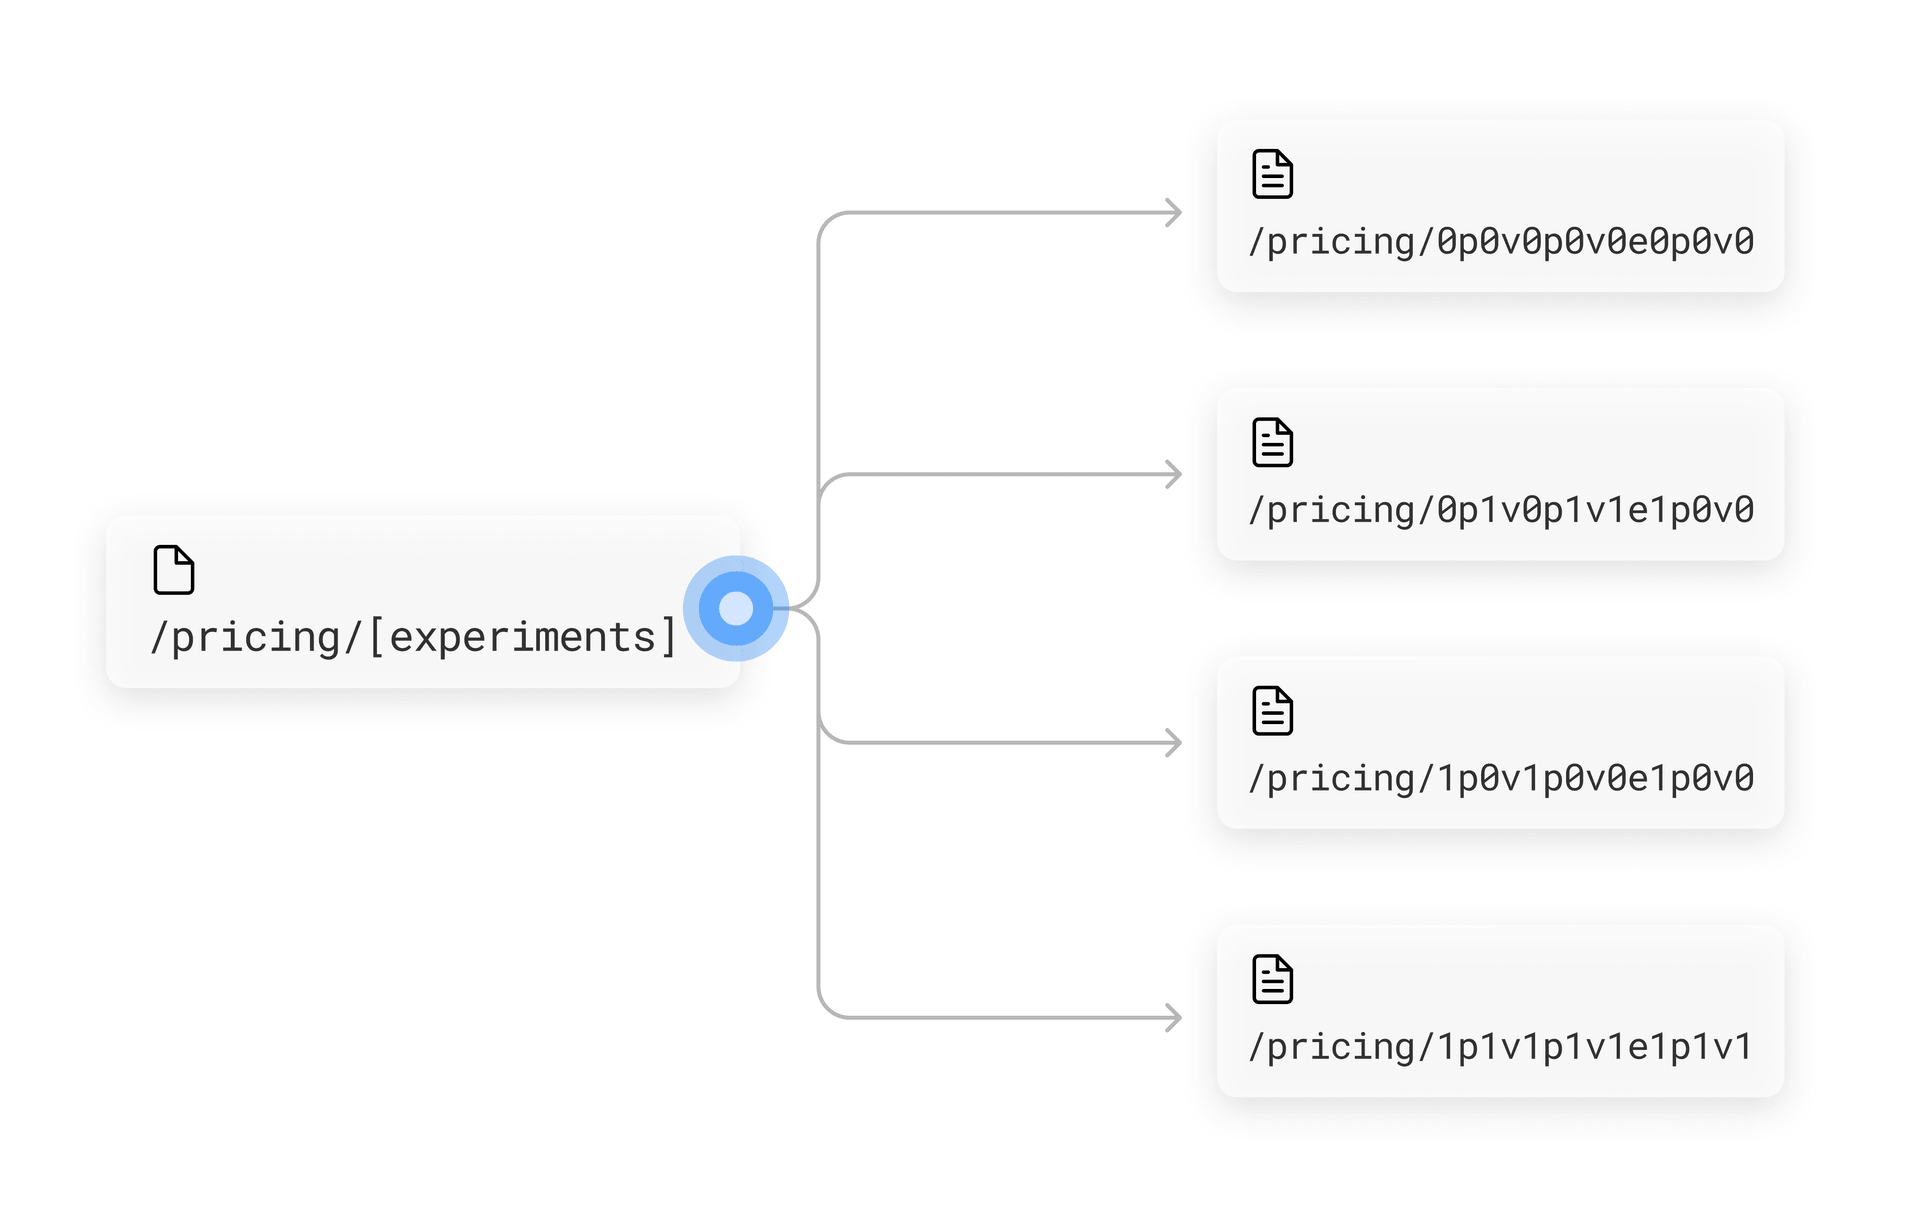
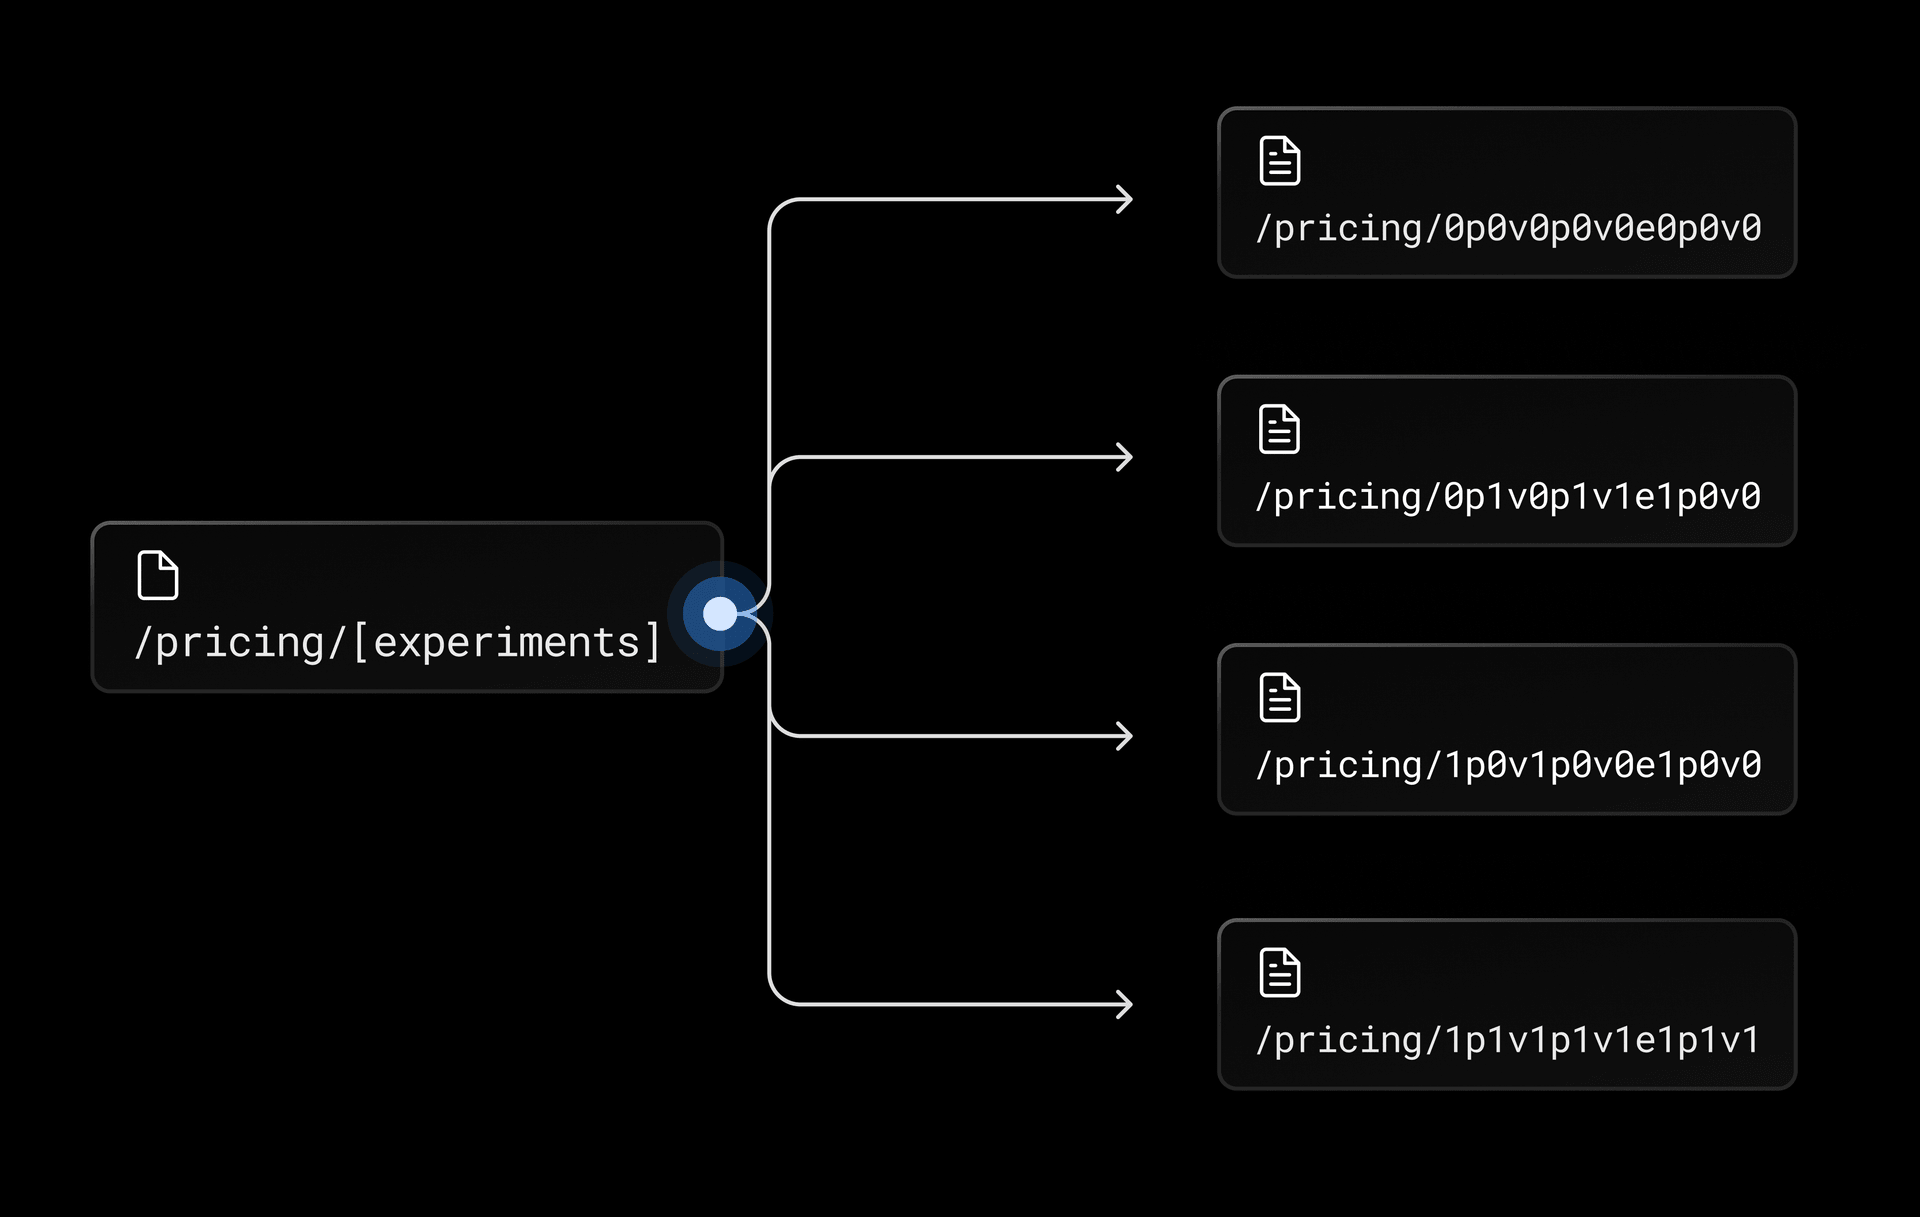
Dynamic routes allow Next.js users to create page templates that change what they render using parameters in the route. For our purposes, we encode the experiment variations into the page's pathname. We’ll supply that data through Next.js’ powerful data fetching APIs: getStaticProps and getStaticPaths.
The engine we built offers a wrapped version of getStaticPaths which builds the paths for all of the variations of the page. Each path is an encoded version of the hash of the experiment values for that particular path, meaning we store experiment values in the URL itself.
Each experiment parameter has multiple options because a page can have many experiments. All possible combinations of experiment values for each path could create long build times if a page has many experiments with many variations. To solve this, we calculate the first n combinations with a generator function and only pre-render those variations, defaulting to 100 page variations per path.
Paths not generated at build time fall back to Next.js' Incremental Static Generation or Incremental Static Regeneration patterns depending on if you've supplied a revalidation interval. Deciding how many pages you want to pre-render is a tradeoff between build time and impact of the delayed initial render for the first visitor to an incrementally static rendered page.
The engine also has a wrapper for getStaticProps where we decode the parameter from the URL to get the experiment values to use in our pages. We also made sure to give our wrapper the same type as getStaticProps so our teammates could use a familiar API.
Because these are statically generated pages, the values are available at build time. Putting together our engine's getStaticPaths and getStaticProps wrappers, our code comes out to look something like:
// Your encoding implementationimport { encodeVariations, decodeVariations } from './encoders'
export function experimentGetStaticPaths( path, maxGeneratedPaths = 100) { return (context) => { const paths = encodeVariations(path, maxGeneratedPaths)
return { paths, fallback: 'blocking', } }}
export function experimentGetStaticProps(pageGetStaticProps) { return async (context) => { const { props: pageProps, revalidate } = await pageGetStaticProps(context) const encodedRoute = context.params?.experiments
// Read from URL or use default values const experiments = decodeVariations(encodedRoute) ?? EXPERIMENT_DEFAULTS
return { props: { ...pageProps, experiments }, revalidate }}Creating data fetching utilities.
Now, when we go to implement an experiment, we can write:
export const getStaticPaths = experimentGetStaticPaths("/pricing")
export const getStaticProps = experimentGetStaticProps(async () => { const { prices } = await fetchPricingMetadata()
return { props: { prices } }})Using our engine's data fetching utilities.
Copy link to headingServing experiments to users
To ensure that our users end up on the correct page variations, we leverage rewrites in Next.js Middleware.
If a user has visited vercel.com before, the rewrite is powered by the user's existing cookie.
If a user doesn't have a cookie, the Middleware reads from Edge Config and encodes the values, determining the route for the variation. Thanks to the speed of Edge Config, we know our user won’t have a delayed page load.
When you use a rewrite in Middleware, your user still sees /pricing in their browser bar even though you served /pricing/0p0v0, the statically pre-rendered version of the page with their experiment values.
import { NextResponse } from 'next/server'
async function getExperimentsForRequest(req) { const cookie = getExperimentsCookie(req) const experiments = cookie ? parseExperiments(cookie) : readExperimentsFromEdgeConfigAndUpdateCookie(req)
return experiments}
export async function middleware(req) { const experiments = await getExperimentsForRequest(req) const path = getPathForExperiment(experiments, req)
return NextResponse.rewrite(new URL(path, req.url))}
export const config = { matcher: '/pricing'}The cookie's value is the experiment parameters assigned through the Statsig Edge Config integration that we set up earlier. Our users will end up in "buckets" based on the values that our Statsig integration assigns them, intelligently handling which users receive which experiments.
It's possible for a client's cookie to go stale and end up out of sync with our experiment configuration. We'll get into how we keep the cookie fresh in a moment.
A user receives a page that was rendered on the server so our React components that use our engine's useExperiment hook will already know their values, resulting in no layout shift.
function Pricing({ prices }) { const { enabled, bgGradientFactor } = useExperiment("pricing_redesign")
return ( <div> <h1>Pricing</h1> { enabled ? <GradientPricingTable factor={bgGradientFactor} prices={prices} /> : <PricingTable prices={prices} /> } </div> )}Using a hook for a statically rendered experiment.
Now that we have the right UX, we need to collect, explore, and analyze data about our experiments to how they are performing.
Copy link to headingMeasuring success
Using our typesafe helpers from before, we built a React context that holds the experiment values for the current page, automatically reporting an EXPERIMENT_VIEWED event to our data warehouse.
export function trackExperiment(experimentName) { analytics(EXPERIMENT_VIEWED, getTrackingMetadataForExperiment(experimentName))}
const Context = createContext()
export function ExperimentContext({ experiments, path, children}) { useEffect(() => { for (const experimentName of getExperimentsForPath(path)) { trackExperiment(experimentName); } }, [])
return ( <Context.Provider experiments={experiments}> {children} </Context.Provider> )}Building a React Context to easily track analytics.
After we’ve collected enough data, we can visit our internal data visualization tools to evaluate the performance of our experiments and confidently decide what to ship next.
Copy link to headingHandling client-side experiments
Not every experiment will happen on the first page load so we still need to be able to handle client side experiments. For example, an experiment can be rendered in a modal or pop-in prompt.
In these cases, we use our client-side React hook since we don't have to worry about the initial loading experience.
function PricingModal() { // Fully-typed `skip` from EXPERIMENTS constant under the hood const { skip } = useClientSideExperiment("skip_button")
return ( <Modal> <Modal.Title>Invite Teammates</Modal.Title> <Modal.Description>Add members to your team.</Modal.Description> <Modal.Button>Ok</Modal.Button> {skip ? <Modal.Button>Skip</Modal.Button> : null} </Modal> )}With this hook, we read directly from the cookie to find out what experimentation bucket our user belongs to and render the desired UI for that experiment. We won’t need server-side rendering, static generation, or routing for these experiments since the user is already interacting with our UI.
Copy link to headingEnsuring experiments stay fresh
It’s possible for a user to end up with a stale or outdated cookie in their browser while experiments update behind the scenes. For current Vercel projects, use Routing Middleware for request-time bucketing and Vercel Functions with Fluid compute for background refresh work. Edge Config still provides fast reads for experiment configuration.
Copy link to headingEffective experiments, every time
With Next.js and Edge Config, we've built an experimentation engine where:
Our users won’t experience Cumulate Layout Shift as a result of an experiment.
We can run multiple page and component-level experiments per page and across pages.
We can ship and iterate on experiments at Vercel more quickly and safely.
We can collect high-value knowledge on what works best for our users without sacrificing page performance.
For the past few months, we’ve shipped many different zero-CLS experiments on vercel.com and we’re excited to continue improving your experience with new insights.
Build better experiments
Get started today.
Let's Talk